Do you need a server for your business?
Take the quiz and find out if it's time for your small business to invest in servers.
You'd be surprised - it's not as costly as you'd think and it can save your business a lot of headaches later on.
Monday, August 30, 2010
Thursday, September 10, 2009
Rubber Feet for Laptops and Notebook Computers
I have a few different brands of laptops and notebook computers. Even some desktop computers, too.

Along the way, I've sometimes lost a rubber foot - the self-adhesive kind that sits on the bottom of the laptop computer.
Now you can order replacements from Dell or HP or Sony or Toshiba or any other reseller. Ever see the price of a set of 4? One place online wants $53.00 for a set of 4. I kid you not. Do a google search for rubber feet for laptops and see what you find.
There are a few alternatives to purchasing the expensive replacement rubber feet from either computer manufacturers or the resellers.
 One such alternative is to try to glue the rubber foot back on with the use of a hot-glue gun. The downside to this method is that if you use a little too much glue, your rubber bumpers may not be even. You can use permanent glues like Crazy Glue, but you have to be very careful to not get the glue on any other part of the notebook computer! Ask me how I know this!
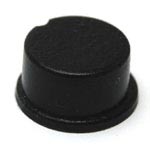
I frequently use self-adhesive rubber feet for many of my projects so I often have some leftover. Some of the thinner ones can be trimmed to match odd shaped bumpers. This is one example:
Thin Rubber Feet. The only problem is that you have to be sure of the thickness of your current rubber feet.
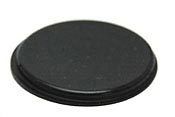
Another solution is to replace all the feet. I've had great success using this size self-adhesive rubber foot on the bottom of various laptops, notebooks and desktop computers:
Thick round rubber foot for the bottom of laptops and desktop computers
The added benefit to using these rubber feet is that it also will help keep your laptop computer cooler as it raises the computer up 4.1mm (the thickness of the rubber foot).
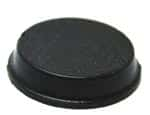
Want to go even higher? This self-stick large rubber foot is 6.4mm high.
Many of the feet shown here are also available in clear, but for equipment like notebook computers, laptops and desktops, it's probably best to 'stick' with black self-stick rubber feet.
Friday, August 21, 2009
Safety Issues Surrounding Solar Energy Systems

The efficiency and cost-saving benefits of modern solar energy systems are strong incentives for homeowners and building planners to incorporate this simple yet powerful technology, once reserved for major industrial applications and exclusive institutions. By its own merit, and especially in comparison with other, more traditional methods of power generation, solar energy is outstanding for cleanliness and ease of use. But as with any electric device, there are a number of safety issues relevant to solar energy systems and their individual units such as battery banks, wires, and controllers. Understanding the risks of a given system and taking proper steps to mitigate these risks can ensure your overall experience is safe, fun, and efficacious. By purchasing and setting up a correct and consistent system, paying attention to basic guidelines, and taking proper care of your equipment, you can add years to the life of your products, and prevent dangerous accidents.
One of the most important safety components of a solar energy system is an auxiliary grounding system. While it may sound complicated, a grounding system is in fact quite simple, consisting of a rod driven into the earth, and a proper wire connected between this rod and the solar energy equipment. This set up comprises a barrier between the equipment and anyone or anything that comes in contact with it, preventing shocks, sparks, and fires. While grounding a solar energy system is a good idea in general, it is also a legal requirement in many areas; you may wish to check with the NEC or National Electrical Code to check for relevant guidelines.
Other important safety considerations to keep in mind include ensuring equipment is of a consistent voltage, and that no two dc and ac wires come into contact. Controllers, inverters, and panels should share electrical ratings wherever possible. These basic steps will help prevent discharge and other accidents, and will ensure proper system functioning. While it may seem obvious, keeping all wires tidy is integral for solar system safety; loose and unruly wires can create hazards for pedestrians, electricians, and other users, and are also more prone to damage, resulting in the risk of shocks, fires, and loss of functioning. Perhaps the most paramount safety rule to put to use when installing and maintaining a solar energy system is to use common sense and caution; a basic awareness and understanding of the equipment ensures that the system's controllers, users, and those nearby need reap only the benefits of solar energy.
Saturday, February 28, 2009
How to Build A Zener Diode Tester
Zener diodes are a special type of diodes which permit current to flow in the forward direction as in a normal diode, but where it differs is that it also allows current flow in the reverse direction when the voltage exceeds the breakdown voltage also referred to as Zener voltage or the Zener knee voltage. This electrical property was discovered by Clarence Zener, which is how they got the name Zener diode.
The breakdown voltage can be controlled and fixed during the doping process of the diode’s production.
A zener diode can be used for a number of applications due to its properties. One such application is as precision voltage regulators. They are also used for clipping and coupling in many circuits.
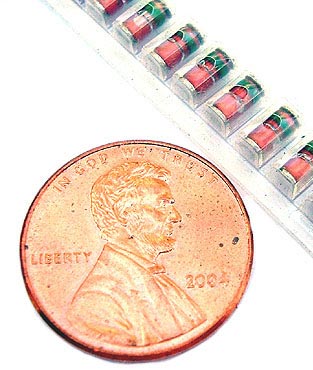
A zener diode tester lets you test whether the zener diode is working properly and also tells the breakdown voltage of the diode. All that is needed is a 12 volt power supply, a 220 kilo ohm resistor, a voltmeter, a variable resistor, and the zener diode under test.
The Positive of the supply is connected to the variable resistor, and the negative and other end of the variable resistor to ground. The voltmeter is connected to the variable point of the resistor through the 220 k resistor. Another wire from the voltmeter connects to the test zener diode, and the other side of the voltmeter and the zener diode is grounded.
Increase the voltage and keep reading the value on the voltmeter, once the value stops increasing; the zener breakdown voltage has been reached. Reverse the diode and if the voltmeter does not show any reading then the zener diode is shorted.
As always, take proper precautions and know what you're doing before you assemble this tester. Need more specific directions? Try here.
Read more about
electronic components and electronic theory at http://www.westfloridacomponents.com.
Friday, February 20, 2009
Top 4 Interesting Ways to Use Rubber Bumpers Around the House
Self-adhesive rubber feet are great to have around the house. You will find them already on the bottom of many small appliances in your kitchen and on your computer equipment,
Here are some ways to use them in different places around the house that you might not expect:
1 - On the backs of picture frames: Trying to keep your artwork in place on the wall? Add small hemispherical rubber feet to the four corners of the frame to help keep the frame in place on the wall.The feet will grip the wall and you'll never have a crooked picture frame again.
2 - On the bottom of your cutting boards: A slippery cutting board can be dangerous. Put cylindrical rubber feet on the bottom to help keep the cutting board from slipping away. The cylindrical feet provide a nice flat surface to really grip the countertop.
3 - On shelves to display upright pieces: If you want to prop something up in a cabinet or on a shelf, use a couple of strategically placed rubber feet (the tapered square rubber feet in clear are a good choice) to keep the items from sliding forward. If you buy them in clear, you'll never notice them, even on lighted glass shelves,
4 - On the walls: There's at least one in every house - a cabinet door that swings open further than it's supposed to. If the door is suddenly flung open, you might have a dent where the cabinet door meets the wall. After reaching for the spackle, put a self-adhesive rubber foot on the wall to protect where the door meets the wall. Bonus tip: the rubber feet can be painted right over with your wall color to camouflage the bumper and make it less noticeable.
Think of ways you might be able to use rubber feet around the house. Be creative - the possibilities are unlimited.
Saturday, January 17, 2009
What is wavelength?
Wavelength is defined as the distance between the repeating parts of any propagating wave of a particular frequency. Wavelength is designated by the symbol, or rather the Greek letter (λ) lambda. Water waves, sound waves, light, or any other type of electromagnetic wave exhibits the wave like phenomenon and is associated with a particular wavelength and frequency.
Wavelength and frequency are inversely proportional and related by the formula that wavelength equals speed of wave divided by the frequency of the wave. Thus, waves that have higher frequencies have shorter wavelengths as compared to low frequency waves, provided the speed of both is the same. Light waves in vacuum travel at the speed of light; hence their speed is 3×10⁸ m/s.
The difference in wavelengths is how the different kinds of electromagnetic energy are differentiated. Visible light is in the range of 700 nm wavelength to 400 nm. This corresponds to 430 to 750 THz in frequency. Sound that is audible to the human ear is between the 20 Hz to 20 KHz frequency which corresponds to wavelengths of 17 m to 17 mm. Thus audible sound wavelengths are much higher than the wavelengths of visible light.
As the medium changes, the wavelength of a wave can change even though the frequency remains the same because the speed of the wave changes. While electromagnetic radiation is usually quoted in terms of wavelength of the wave when traveling in vacuum, wavelengths of sound waves are expressed in those of a medium, as sound requires a medium to travel.
Read more about
electronic components and electronic theory at http://www.westfloridacomponents.com.
Tuesday, January 13, 2009
Things to Consider Before You Install a Solar Energy System
Once you've made the choice to purchase, install, and use a solar energy system, your journey from conceptualization to reaping the efficiency and savings benefits is likely to be a short one. While there are a few considerations and choices to keep in mind while choosing parts and implementing the system into your overall structural design, the process is a relatively simple one and can be done on your own, or with the assistance of a solar panel technician.
If you choose to design and install a set of solar panels by yourself, be sure to keep the following in mind, and as with any project, avoid low-quality components, as their small initial savings will lead to headaches and increased costs down the line.
Choosing appropriate specifications for your panels and subsequent battery bank is an important step, which should follow the determination of your overall solar energy load. Upon deciding how many appliances you'd like to run on solar energy, and obtaining their voltage requirements, you can arrange for an appropriate solar array and corresponding battery bank for optimal operation.
A proper understanding of the wiring requirements for connections between system components will ensure smooth operating and help prevent any shortages or other accidents.
Be sure to consider grounding your solar panels along with their system accessories via a grounding wire and rod; in addition to keeping you and your system safe from shock and fire, grounding is required in many areas by local laws.
When installing solar panels, keep common-sense placement in mind; areas with ample sunlight according to the season and directional orientation will work better than locations with shadows cast by trees or other obstructing objects.
The purchase and installation of important solar panels accessory components such as a controller (to regulate the energy flow between solar panels and the battery bank), and an inverter (to process energy from the battery bank to the electric system of your home or project location) will make easy and efficient system operation possible.
Once you've completed installation of your solar panels, there is little to no maintenance needed. The batteries themselves are the only components requiring mechanical upkeep of any kind.
Aside from reading the output on your controller to ensure you're getting the most from your solar panels, there's little work to be done, allowing you to sit back and enjoy the satisfaction of a self-sufficient power system that saves you money while helping to preserve the earth's precious natural resources.
Subscribe to:
Posts (Atom)